
| Home Page - | Patterns by Jen - | Adopt Now - | Adopt on Ebay |
|
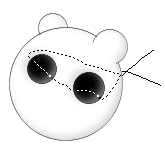
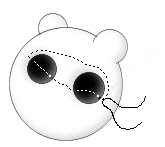
How to place the eyes. . . When I place my eyes I use size "D" nymo thread or dental floss. For the eyes I mainly use 4mm Czech glass jet black round beads. I've heard others suggest onyx and hematite beads too. If I don't use the round beads then I use glass eyes with the wire loop in the back. You can find many bear-making supplies online. Ebay is a great source. Example 1 - I start by entering the back of the head and exit where I want the first eye to be. I pick up the eye and go back into the head just 1 stitch away from where I exited and back out of the head in the spot where the next eye will be placed. I pick up the bead and enter the head, again just one stitch away, and then exit the back of the head just 1 stitch away from where I entered. Then I tie a strong knot, using at least three knots and hide the thread inside of the head. Example 2 - I place the majority of my eys in this way. I think it gives the face a little more character by giving a rise to the stitches between the eyes. You start by sliding the first eye onto the needle, enter the head where the first eye will be placed, exit the head where the second eye will go. Then pick up the second eye and enter the head a stitch away from where you exited and a stitch away from the first eye. Tie a strong knot. The tighter you pull the more the eyes will sink in so watch the face as you are pulling. Hide the thread inside the head. |
 Example 1
|
|
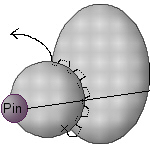
How to attach muzzle. . . "X" marks the begining of the thread tail left on the muzzle. Begin by pinning the muzzle in place with a straight pin. Thread the muzzle thread tail. Working between crochet stitches, insert the needle into the head, exit head and go under both loops (the same loops you would go under if you were making a single crochet stitch) on the edge of the muzzle. Continue all the way around the muzzle until you are two stitches away from a complete closure. Stuff muzzle firmly. Finish sewing the muzzle to the head. Hide thread tail within the muzzle. |
|
|
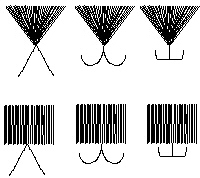
How to stitch the nose. . . When making a nose I embroider from the bottom to the top, but never side to side. I start with about 5 stitches just to give me a kind of outline and then continue to fill in the gaps. I try to keep my stitches tight so there aren't any stray threads sticking out. I uses a full 6 strands of embroidery thread on my noses. |


|
|
How to stitch the mouth. . . Using the remaining thread that should be sticking out from the bottom of the nose, stitch the mouth. Get creative. I've given you just a few ideas in the drawing. |
|
|
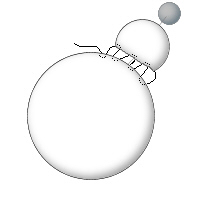
How to attach the ears. . . After stuffing the head, placing the eyes and embroidering the nose, I stick a straight pin through the ears and find a position on the head that suits the bear. Using my thread tail from the ears I sew the ears in place. |
|
|
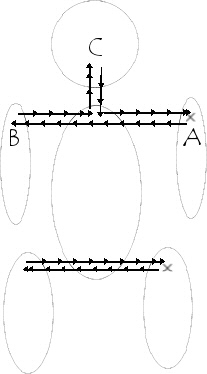
How to thread joint. . . Use strong Dental floss threaded on a long, sturdy needle. Leaving a long tail, insert needle at A, exit at B, go back through the body where you entered and out through “the top of the neck, take a deep stitch through the base of the head C, go back through the neck in the same hole and exit at A. Notice that you are not going through the arms completely. Just through the insides where the arms meet the body. That way your joints will not show. Tie a very strong knot. Use at least 3 tight knots. Hide your dental floss in the body. Cut off excess thread. The legs are done in the same way. Your bear is now posable! If your knots are too loose then your bear will not be able to hold position. Dental floss is highly recomended. |
|
| How To... - | Adopted Bears - | Pixel Art by Jen - | Email Me |
|
|

|
| ©2006 - 2007 Jennifer Creasey, Bears by Jen® No images my be copied without written permission. | |